Hi everyone. It is that time of year again. Planning your
Thanksgiving menu, and cooking a delicious, juicy turkey! Last year I
composed this step by step tutorial. I have heard so many young women
say how they are afraid to cook a turkey! My own two daughters
included! Well fear not. It is one of the easiest things to make.
This post is a repeat of the same one I did two years ago. I hope this
might help someone who has never attempted to make their own turkey.
Bon Appetit!
It's here. My very first Virtual Cooking Class. I hope that I am
getting this posted in time to help those of you who may not ever have
cooked your own turkey before. Let's get started. I was given a 13
pound turkey by my son in law, Jake. The employees at the hospital were
given these, and he gave it to me for my cooking class demonstration.
So if you have purchased a fresh turkey, you can just omit these first
few steps. But if you have a frozen turkey, you need to defrost it.
You can do this by placing it in the fridge for a few days, or you can
use a cold water bath method, which is what I did. Place entire turkey
in packaging, into a large bowl, or clean sink of cold water. Filling
to the top.

You
will want to drain the water out about every 30 minutes or so,
refilling the sink with fresh cold water each time, until your bird is
defrosted. I did this for the better part of the afternoon, then
wrapped the nearly defrosted turkey in a towel, still in package, and
placed in large bowl in the fridge in preparation to cook, today.
Let's
cook. Turn your oven on to about 425 degrees. Set your rack to the
lowest position. Unwrap turkey, and put into large bowl, or very clean
sink, and run fresh cold water over bird, carefully washing both outside
and inside.
Lifting wings, and checking for any unplucked feathers. There will be a few, so pluck those by just pulling out!
See
those little feathers underneath the wing? Pull them out. Remove the
neck from neck cavity, and the giblets from other end. These will be in
a paper bag. Just pull the bag out, and either discard, or rinse and
place in pot with water to simmer for giblet gravy.
Place rinsed bird onto clean towel on countertop and blot dry inside and out with another clean towel.
If there is any fatty tissue pieces inside or near the cavities, remove this.
Once
nice and dry, make sure you have all of your other ingredients on hand,
and the roasting pan and rack ready to go. If you don't have a rack,
not to worry, just crinkle up some aluminum foil and place in bottom of
pan like I did. I didn't have a rack small enough for this pan.
Here are my veggies, herbs and citrus all washed and ready to go.
There
are many different ways to cook a turkey. I have tried lots of ways. I
like to do it this way, especially if I am not making stuffing and all
of the trimmings. This turkey is just going to be sliced up for
sandwiches.
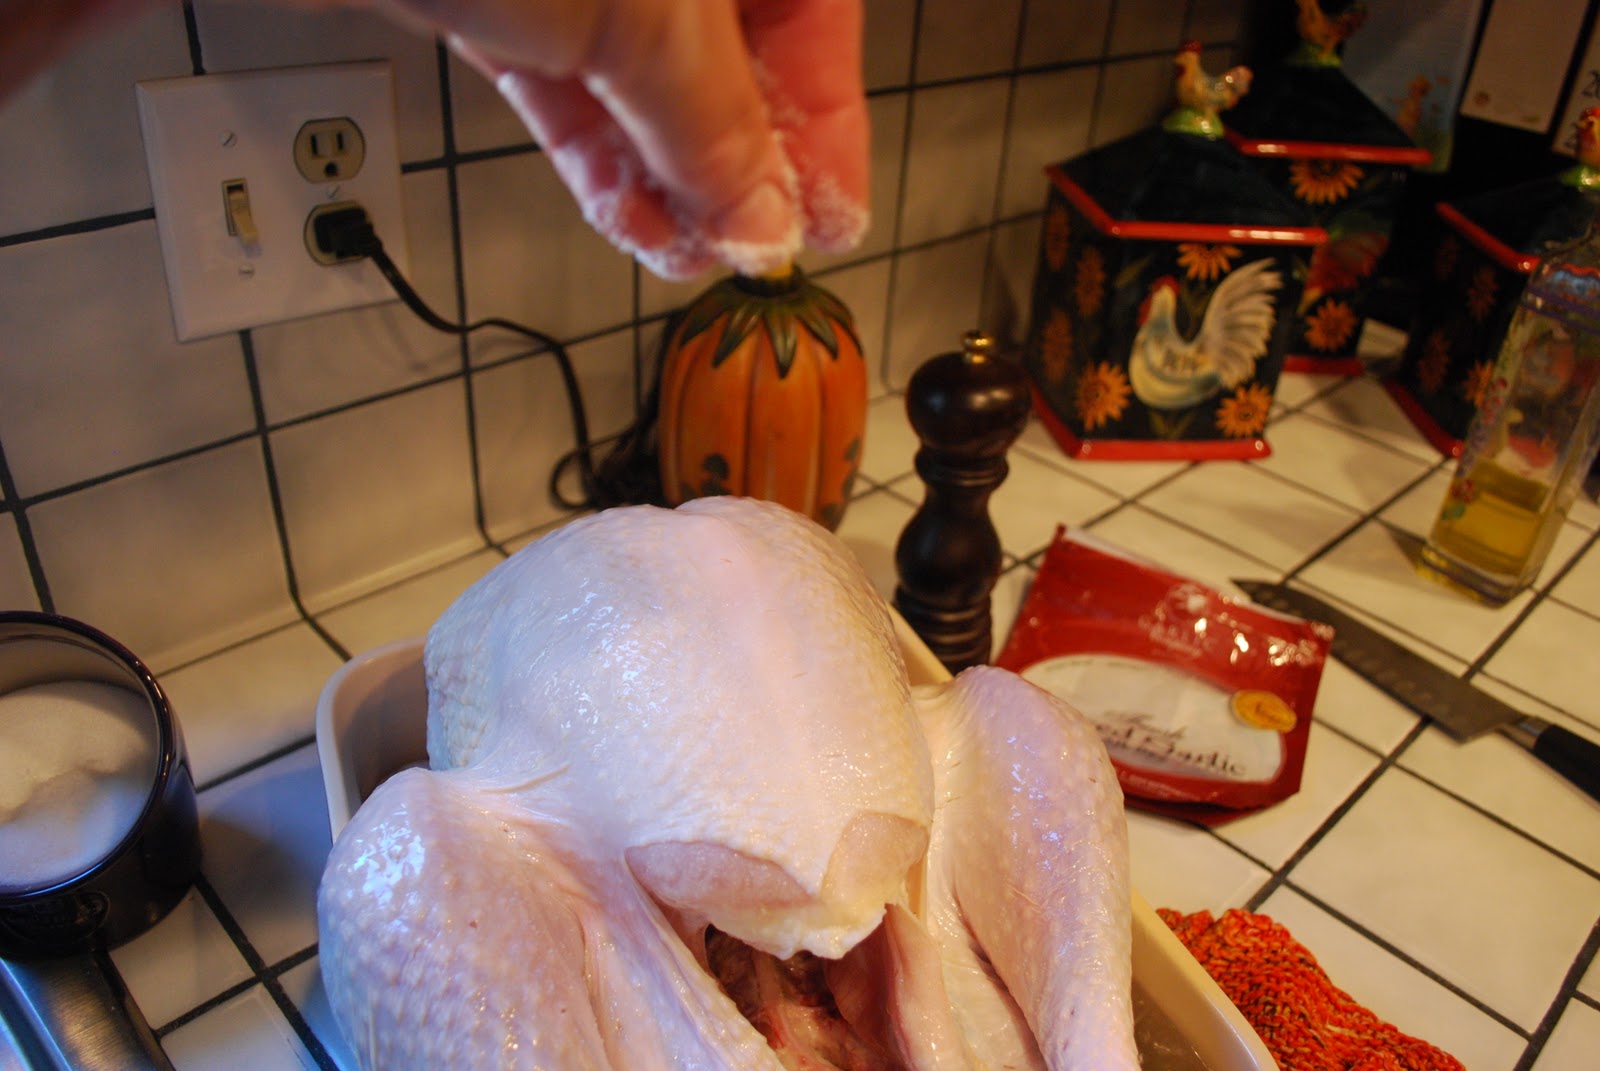
Drizzle olive oil over clean and dry bird, rubbing into skin so that it reaches all areas.
Once
oiled generously, place into roasting pan, breast side up, and tuck
wings up underneath bird. Sprinkle with salt and pepper liberally.
Now cut your onions into quarters, and half the lemons and quarter the oranges. Rough cut celery, tops included.
I
love this butcher block! My Mom gave it to me when she moved because
it didn't fit right in her new kitchen. Lucky me, it fits perfectly in
mine. It is on wheels, and it goes all over my kitchen while I work.
And one of my favorite things about it is the large removable bowl that
rests just beneath this circle cut out of the center of the butcher
block. You chop, and drop your trash right into the big bowl beneath.
Making cleanup a breeze!!! It also has a groove in the the butcher
block on one side for carving meats, and catching the juices. LOVE this
piece!!! Thank you Mom!!!
Once you have all the veggies and
citrus cut up, you are going to fill both cavities with this. Before
putting lemons and oranges into cavity, squeeze some of juices out first
into cavity and on and around turkey. I don't cut my fresh herbs
though. I just tuck them into the cavities. I picked fresh thyme, sage
and rosemary this morning for this.
Oh,
almost forgot to tell you about this neat product. It is minced garlic
that is prepackaged for convenience. I usually have fresh garlic on
hand. And I keep tubes of minced garlic in the fridge too. But this is
also very good, and I find it at fresh & easy. It is in above
photo in the cello package. Just open up cello pak and add this in with
all of the other veggies.
After stuffing all that you can into the
cavities, you are going to push the fresh herbs in, and then tie the
legs together. I did this with dental floss.
With
any leftover ingredients, I just fill the spaces in the corners of the
roaster. Isn't he looking pretty? Easy stuff so far, right?
There
he is all trussed up and ready to go into the oven. But first pour a
little chicken broth into pan. Be careful, especially if you are doing a
smaller bird, with a pan that is stuffed to the brim. Pour slowly into
the corners. Oh about a cup or so. Just eyeball it, no need to
measure.
You are almost there. Put the bird into the oven on lowest rack at about 425 degrees.
Leave
it alone for 30 minutes. Take out after 30 minutes, and tent bird
loosely with aluminum foil that has been sprayed lightly with olive oil
spray. This is what the bird looks like after first 30
minutes on higher heat.
The
reason for covering the bird loosely in foil at this point, is to
prevent it from over browning. Now you are going to turn the oven down
to 325 degrees, and put bird back into oven. A general rule of thumb
for cooking time is about 20 minutes per pound. Or you can use an
instant read thermometer and take bird out when temperature has reached
165 degrees. For remainder of cooking time, open oven door and baste
turkey with cooking juices about every 35 to 45 minutes or so. Taking
care each time to replace foil loosely over top of bird.
I
let the grandkids use my turkey baster in the pool over the summer, and
it was in the deck box outside, so I used a silicone pastry brush which
works just fine to baste too. You could also use a ladle or large
spoon. Slide him back in there, letting a bird of this size cook about 3
hours or so. I let this one go for 3 hours and 10 minutes.
The
way my Mom taught me to tell if the turkey is done is to poke the fatty
part of the leg with a fork and if juices run clear, it is typically
done. If you are not confident with this method, then take a pot holder
and jiggle the leg a little bit. It should be very loose, and almost
as if it may come apart from the bird.
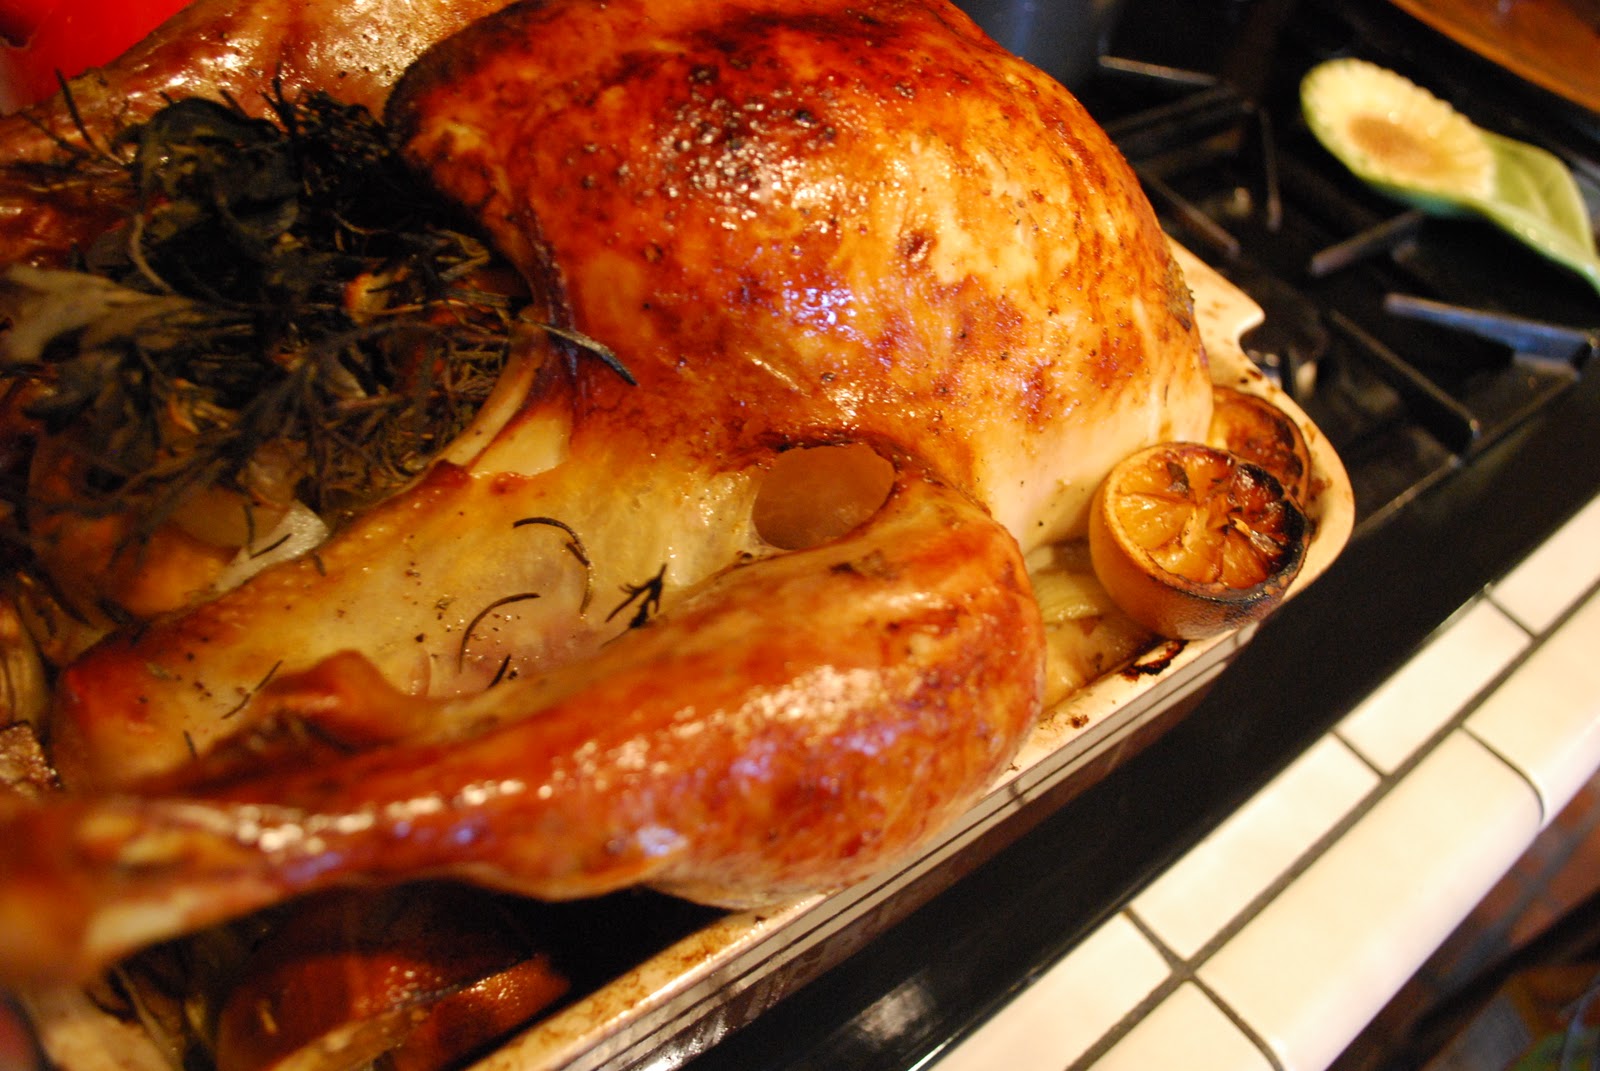
If
you look closely on the above photo, you can see that the leg is
separating from the body of the turkey indicating that it is done.
So this bird is all finished cooking. Look at the beautiful golden brown of the skin.
Remove
turkey from oven, and place on stove top keeping it covered up with
foil and let it rest for at least 30 minutes before you begin to slice.
It will stay hot, trust me!
To slice, I am old school, and use an
electric knife. Lift the bird out of the pan carefully onto a cutting
surface. Since I didn't have a rack or lifter, I used two heavy duty
spatulas and removed it without any trouble. Remove the veggies that
were inside cavities and discard.
Remove
legs by pulling out and away from the bird. It should pop off very
easily. If you need to, take the knife to run it through any tendons
that are keeping it from snapping off. Set legs aside. Wings most
likely will come off almost by themselves. They can also be easily
removed, and set these aside with legs. Now you will begin to slice the
breast meat off of the turkey, starting on one side, then moving to the
other.
The
bird should slice through very easily, and by letting it set for 30
minutes beforehand, you won't have the juices running all over the
board. They stay in the bird, keeping it moist and delicious!
Just keep slicing until you get all of that nice white meat off the bone.
For
the dark meat on the legs, I slip skin off, and then just use my hands
to take the meatiest pieces off the bone. The wings don't have much
meat, so I eat that while I am working!!! This is a messy job, so be
sure you have a cute holiday apron to put on while you work!!!
I received this in the mail yesterday from a blogging friend Jann over at
have a daily cup from Mrs. Olson
I love it Jann!!!!
There
you have it. How to cook at turkey from start to finish. Since I am
taking mine up the mountains with us the day after Thanksgiving for
sandwiches, I didn't make any other dishes. Of course juggling all of
the holiday meal makes for more careful planning. But if you are new to
cooking, or new to cooking a turkey, I hope this helps.
A 13
pound bird should yield plenty of meat fora family of 6 or so. In
addition, I picked the carcass of any usable meat to use for a Turkey
Pot Pie later in the weekend as well. You could also save your carcass
and place it in a ziplock bag and freeze it to use later for stock or
soup.
The two bags are of scraps and are going into the trash. The pieces in front is what I will use for a Turkey Pot Pie.
I sure hope this will help some of you to make your first turkey! There is nothing to it!!!!
Thanks for joining me for my very first virtual cooking class.
Bon Appetit!!
XO Kris


22 comments:
This is the first year since I've been married that I'm not cooking Thanksgiving dinner. I'll miss not fixing my turkey and stuffing. Your turkey looks so good. Bon Appetit!
What a nice service to those who need some help. Dayle is our turkey baker and I leave it to him. :-) I do all the sides. Well, he makes the stuffing too. But I do the rest! I love the new pix of the grands!
*:._.:*~*:._.:*~*:._.:*~*:._.:*~*:._.:*:._.:*~*:._.:
*H*A*P*P*Y* *T*H*A*N*K*S*G*I*V*I*N*G*!*!*
*:._.:*~*:._.:*~*:._.:*~*:._.:*~*:._.:*:._.:*~*:._.:
((hugs)), Teresa :-)
Great post for those who are new to this tradition! I get up early and begin the turkey before six a.m. Yours looks delicious!
Blessings,
Betsy
Such a great idea with the foil trivet! I never have trivets that fit the dish I want to use, so I will be stealing this idea!! I hope that you have a great thanksgiving turkey this year. xx
this look amazing and delicious dear Kris and.love your apron! nice post!
today I post a turkey breast is mire. smaller than your turkey:))
Very nice of you to share this tutorial not once but twice!
Your turkey looks delish :)
Happy Thanksgiving Kris!
This post is so perfect and has made me so excited for Thanksgiving.
Thanks for reposting - I actually roasted a chicken using your method of stuffing with citrus etc and it was fantastic. Happy Thanksgiving to you and yours!
Cheers - Joolz xx
It is so thoughtful for you to re-post this again. I am sure there are those out there who don't have a clue and feel intimidated by that big bird. They will benefit from all the help you gave in this posting. Some folks don't realize how much work goes into doing this tutorial. I guess my 2-cents worth would to remind those first time cooks that the bird is dead, it won't bite ya, lol. It would be a whole different ball game if they had to kill a live bird and pluck the feathers, ha ha ha .
A Happy Thanksgiving Kris to you and your loved ones.
(((HUGS))) Susanne :)
Ha, ha, what a fun surprise to see you in your apron again! Love it! My bird will be stuffed, but I am saving this to try sometime. I do a lot of the same things, but I love how you stuffed it! Have a wonderful holiday!
hugs,
Jann
I am sooo in the mood to cook a turkey this year. My step mom is having us over so I will be bringing the ham and pies instead. My favorite part of Thanksgiving is how the house smells when the bird is cooking. You really know it's the holidays then. I love you!
I love your chopping block too! I haven't seen one like that before.
Great tutorial, thank you for sharing.
x
Pretty enough for a magazine spread!
I remember this post so we have been friends for a while. I am still leaving the turkey to my husband.
Hugs,
Meredith
Hi Kris, I know many will appreciate your reposting this; as a young mom I certainly would have. I so remember how terrified I was cooking the first few Thanksgiving dinners; my girls are very intimidated by it as well. I love turkey-for a big meal or simply for sandwiches as well as the carcass for soup.
I pray you have a peace & love filled Thanksgiving and good time in the mountains.
Hugs, Noreen
OK, now I'm hungry! What a perfect looking turkey, making my mouth water. I love the butcher block, how great. wishing you and your family of wonderful Thanksgiving. Blessings.
I almost needed this because I thought my husband was going to be out of town for Thanksgiving. Fortunately, he got his days mixed up and he will be home to cook the turkey. He cooks for the big day every year. Hope you have a wonderful holiday, Kris.
PS. You look cute in your picture too!
Happy Thanksgiving, Kris! You look so cute in your apron.
Don't forget to wear your Pie Pants tomorrow ;))
Happy Thanksgiving, Kris. x
Happy thanksgiving dear kris:))
I so remember you sharing this Kris! Looks awesome. My husband actually fried the Turkey outside this year and it was amazing! Hope you are enjoying the season:) XO
Post a Comment