Good morning everyone! As I sit here today, the sun is streaming through the picture window, the birds are all a'twitter singing their morning songs, Big Rudy Roo is cocka-doodle-doing about every 5 minutes on cue. Surely Spring is almost here.
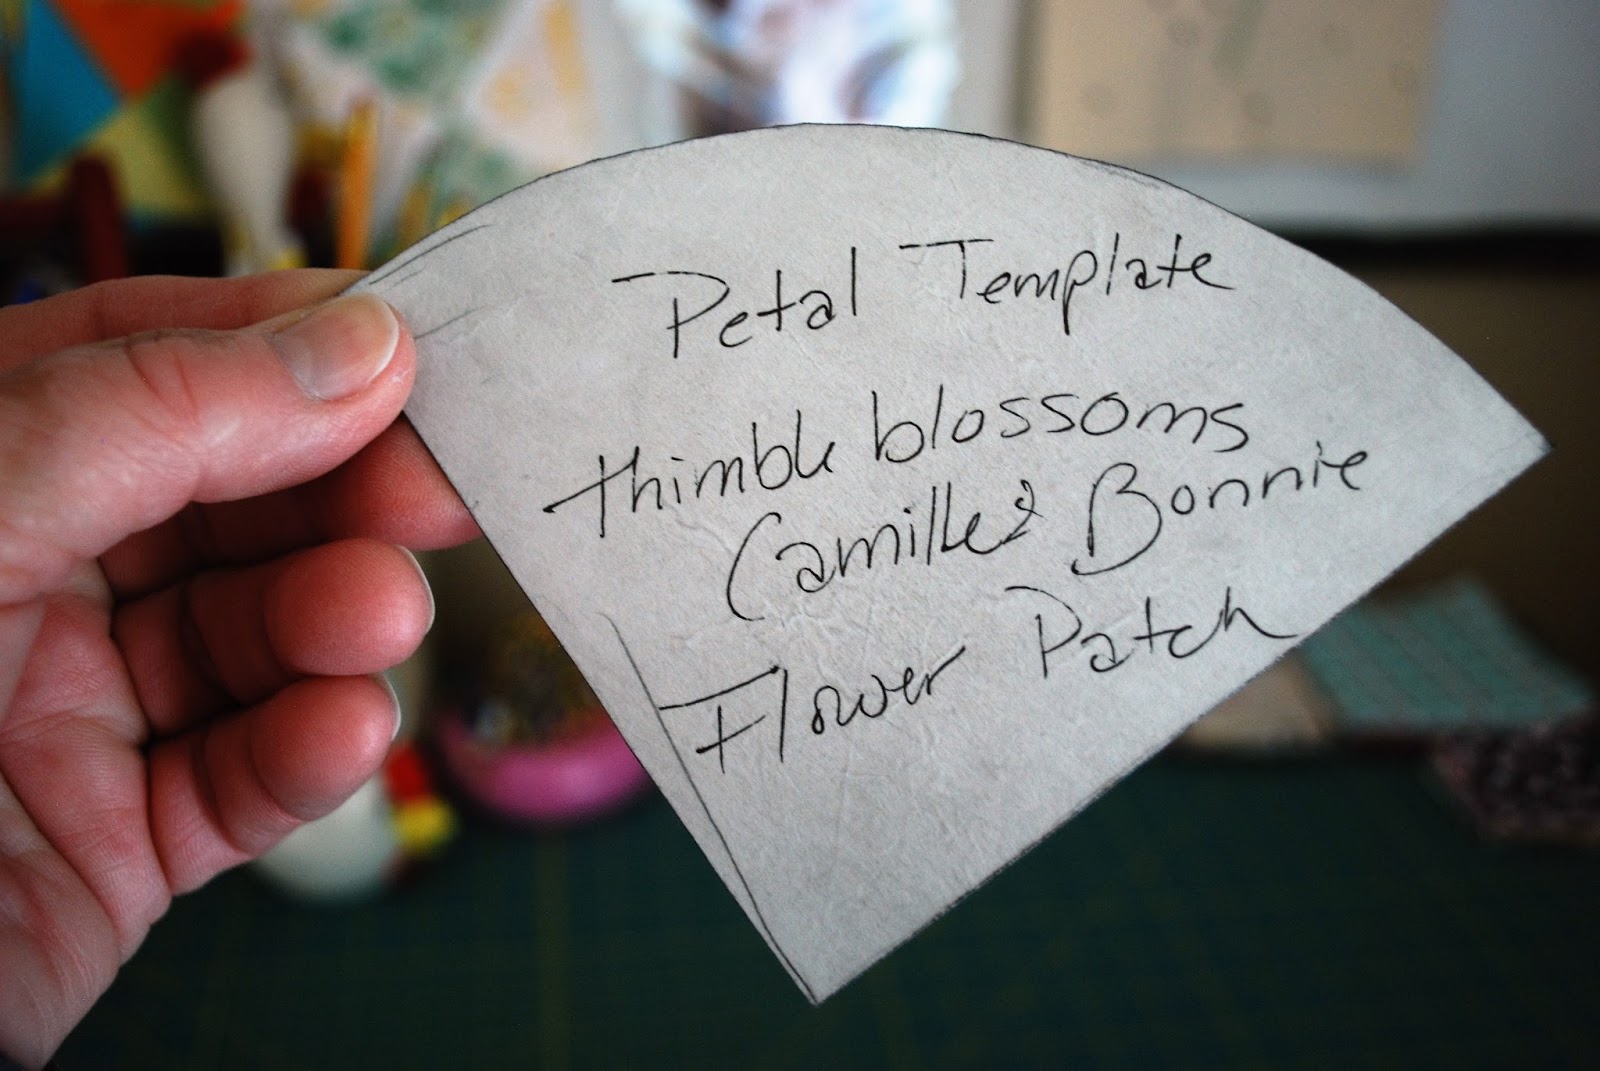
As I had shared with you last week, I was asked to do a shop sample for my LQS. The owners said that they needed it, "like yesterday" but no pressure! Ha!!! Pressure is my middle name. I work best under pressure. I didn't begin the quilt last Tuesday, but I did read the pattern over thoroughly. On Wednesday, I began to cut it out. I spent two days with the cutting, and the applique preparations on this quilt. It was far more work than I had anticipated it being. Each one of the petals had to be separately appliqued. Which meant, I had to first make a template for the petal. Then trace 108 petal shapes onto fusible web. Cut out 108 shapes of fusible web. Then transfer fusible web to fabric with heat, and again, cut out 108 petal shapes!!!! That took forever! I like to use a medium weight cardboard for my templates. Cereal boxes work perfectly.
Then I use freezer paper to iron on the other side to label the template. The freezer paper is ideal, and stays put for a very long time.
I am usually pretty organized by nature, ( some of my family members reading this are rolling their eyes right now) okay, I am very organized by nature. Like, OCD organized. Like, my spices may be alphabetized, and what's wrong with that??? So when I sew, especially a large quilt with lots of pieces, I like to keep things really organized. I work in piles. I tend to do one part of the quilt, and complete it, then move on.
I have made several different sizes of design boards. Lori Holt of Bee in my Bonnet has a great tutorial for them. Using a medium sized design board, I put all of my cut pieces, labeled with a small sticky tab to keep them straight. I also like to lower my ironing board to table height, and bring it up right next to me where I am sewing. This way, everything I need is within reach. My iron, my pressing surface, my machine, my quilt pieces, my mat and rotary cutter...all right there next to me. I did all of my regular piecing on my little Featherweight.
For doing my applique stitching of the petals, and the stems, I twirled around to use my Singer One. In the photo below, you can see that from my red office chair, I can turn around and use the Singer One that I keep in the armoire.
So, using a 2.5 length blanket stitch, I appliqued 108 petals to their 5.5 inch background block, and 36 green flower stems to a 5.5 background block.
When sewing, I ALWAYS, always use this gripping balm. I cannot sew without it. It is especially helpful for free motion quilting, to get a grip onto the fabric. But also for handling any piece of fabric, and doing all of the separating that is necessary for sewing small pieces.
I keep it next to my machine, and dip my finger tips into the jar as often as needed.
Speaking of tips that help with sewing, I also swear by this little handy tool.

I bet every one of you, 40 and older, has one and doesn't even know it. It is one of the tools that come with your nut cracking kit. It is the perfect gadget to use for accurate piecing. I hold it in my
right hand, and guide the fabric along using that pointed end all the way to the needle. The gentle curved tip, allows for easy separation of pieces, and it stays out of the way of the machine as it feeds the fabric along.
I find them in the thrift stores for only 50 cents or so, all the time. I like to have one at each of my machines.
Another thing that helps me to get that perfect stitch down, is to mark the foot with a Sharpie pen. It is actually just a small tic mark to help my eye see the line I want to follow. In this photo, it looks much bigger because I have magnified it.
This will help you with accuracy, and to achieve that crisp line of stitching every time.
I like to keep a can of air near my machine too. I regularly blow out the bobbin shuttle and holder, as well as the stitch plate of my machine to keep it free of built up threads and dust.
And one last tip, I put a piece of no slip rug grip under my machine foot to keep it from sliding across the floor. Really helps to keep it in one place.
Now back to the quilt. As each phase of the quilt was finished, I kept it in a stack and moved on to the next. However, I wanted a good visual to go by, so I did complete one entire block, and hung it on a design board to look at for reference as I was working, right off the bat.
My cut pieces began to dwindle, and my stacks of completed portions began to grow.
The two halves sewn together as one, and then the green leaves were added. And then the blue corners to each flower block.
There are a lot of points in this quilt, so accuracy was critical for matching them up. I have discovered that setting your seams with a hot iron each time is important. This buries the thread into the fibers, and helps ensure an accurate and crisp edge.
After I completed the blocks, I stacked them in the order in which I wanted them to appear in the quilt. Then simply fed them into the machine, one after another. When I unclipped them, one at a time, I set the seams, and placed them back in the same order.
I kept the stacks in order as I rotary cut the excess fabric off at 1/4 inch seam line.
Each block consists of 4 squares sewn together. As I completed the blocks, I laid them out onto a clean sheet I had put across the top of my bed, to avoid the quilt coming in contact with any dog hair that may have been on my comforter from Lil' Jack!
When I found the arrangement that was pleasing to me, I began to sew each block into rows, and then rows together into a finished quilt top. By the time I had sewn my last piece last night, it was well past 5:00, so the light was not good for a photo. But I had to see it all together, and it was too big to put anywhere other than the clothes line.
The colors are fresh and Spring like. And I love the scrappy manner in which the tulips are arranged.
I used an entire layer cake, as well as assorted greens, and a green dotted swiss for the background.
All fabrics were chosen by the quilt shop owner, from the Vintage Picnic line.
My husband was out of town on business for two nights last week, which gave me extra time to sew. While I didn't record the hours spent, I am figuring it was somewhere around 30 hours. Each and every one of them, sheer joy for me!
I ironed the quilt top and laid it on my ironing board in my sewing room last night. When I got up this morning and walked through there, the sun was shining on it so prettily. I put my vintage looking picnic hamper on it, and took this photo.
Considering that the name of the fabric line is Vintage Picnic, I thought it would be apt for a photo.
Thanks for sharing the making of a quilt with me. I will bring it to the quilt shop today where the owner will do something wonderful on it with her long arm quilting machine. When she is done, I will pick it up and bring it back home to put the binding on. And then it will reside at the quilt shop to showcase this fabric line until the fabric line has sold. Then, it will be mine forever! I will do another post when it is all quilted and bound.
Happy day to you.
XO Kris


 I bet every one of you, 40 and older, has one and doesn't even know it. It is one of the tools that come with your nut cracking kit. It is the perfect gadget to use for accurate piecing. I hold it in my


.png)


16 comments:
Such a charming quilt, Kris...and I loved seeing your process in making it! You are one talented lady!
Wow!!! Beautiful!!!! That sounds like so much work, but it was worth it!
I enjoyed the making of the quilt with you today Kris. Although I have made a few quilts, they're nothing like yours...so professionally done. I do have one of those little nut pickers and I also have that stuff you put on your fingertips. I Always use it for paper and never thought about using it for material. Thank you! And I am so glad I read your blog today and saw where you put the nonskid stuff underneath your sewing machine pedal. Mine is always slipsliding around and I never thought to do that. Thank you again! I'm looking forward to seeing the completed quilt. Have a wonderful day my friend.
Blessings, Betsy
I know nothing about quilt making so enjoyed seeing the process. That quilt says spring and the colors look good together, Best of all is that you will bring it home eventually!
You did an absolutely wonderful job of that quilt! Its soo pretty and I love the fabric! and the pattern. It sounds like it was a lot of work, but worth every minute. You are WAY more organized about your sewing then I am. I could take some pointers. I get to pick my quilt up Thursday. Still need to bind it of course but almost done. I am running out of time to the shower and Claire's birthday so I will be busy busy BUSY for the next few weeks. There's a new line of fabric coming out in March called teddy bear picnic that I am really anxious to get my hands on, and I still want to jump on to the one Lori Holt is doing right now...but I am way behind. Don't think I will let that stop me though. Hope the rest of your week is good!
Wow! That quilt is stunning! You did a beautiful job!
Kris, you did an amazing job, so much work but worth every stitch. I love the vintage feel of the fabrics and the beautiful pattern. Tulips are my favorite!
you are my sewing hero.
Hugs,
Meredith
That quilt is absolutely gorgeous! Love the fresh colors. You are SO talented, I don't think there is anything you can't do!
It is beautiful Kris!
Just wonderful Kris. Thanks for sharing your process with us. I've never heard of that balm, I know that would be a big help to me when sewing. Can't wait to see the completed quilt after seeing how adorable it is already.
Beautiful quilt, Kris. Thank you for sharing your process. I am very organized as well, I just work better that way.
WOW!!! Thanks so much for this wonderful post, Kris. I enjoyed following your creative process and appreciate knowing your tips...none of which I would have imagined for myself. My folks had nut picks like the one you showed...which I can remember using to pry nuts from their shells :) Wishing you happy days xx
What a fabulous tutorial, Kris! I learned so much. I'm in the process of sewing our daughter's wedding dress and I picked up some great tips here! The quilt is so beautiful! What a great deal to be able to keep it afterwards! I love the colors. You have quite a system going! I cannot wait to see the completed piece. Thank you for visiting me. I've missed you too!!!!!! I'm still gonna get to see you someday when I get out there. New grand baby coming in June!
I truly enjoyed watching you put this quilt together. I would love to do quilting but I'm not sure I have the organizational traits to do it. I LOVE the way it turned out and can't wait to see it all done. ((hugs)), Teresa :-)
(I'm off to the hospital to bring Dayle home.. thanks for your comment and prayers.)
Kris, Wow what a job you are working on!!! Love the fabric and I am a bit jealous because my baby lock doesn't have a blanket stitch. You've also reminded me to get a can of air for my machine. So I hope you are being paid a very nice price for your work! I'm so impressed. I've been up to my ears in quilting lately, hardly have time for anything else.
Sending hugs to you today, please send some warm weather our way. It's sunny but cold; oh wait, we are supposed to get to the high 60's on Saturday-yippee.
Hope you have a productive day!
Love, Noreen
I am in total awe of you Kris...fantastic work!
Waiting to see it all quilted!♥️
Cheers!
Linda :o)
Post a Comment