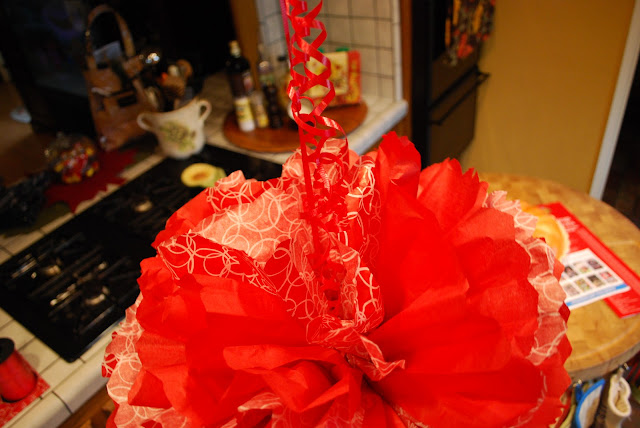
Several people expressed an interest in knowing how to make the tissue paper party pouf balls that I made for our granddaughter's birthday party recently. So I made one this morning, just using some tissue paper I had on hand. Let's begin.
Using at least 12 sheets of tissue paper, more if you want more fullness, lay them out with the short end towards you. I used 14 sheets for this particular one. In this case, I used some solid red, and a few sheets of red print. Using only a few of the print, I layered them evenly spaced between the reds.
For future reference though, I will not use a print paper such as this that has a "right" and a "wrong" side. The "wrong" showing none of the pattern. Stack them nice and neat, long side away from you.
Beginning with the short end closest to you, make folds, accordion pleat style, about 1 to 1 1/2 inches wide. Front, then back, like a fan.
Once you have reached the end, fold the entire length in half, determining the middle.
Taking ribbon or wire, or fishing line, tie the middle with a tight knot. Not cinching the paper though. I made mine leaving a very long attached piece of ribbon to hang it with as well as extra to curl the ribbon too. You can also hang then from fishing line so that they appear to be floating.
Next, you will want to cut or round the corners, to form your petals. I do this while holding it over the waste can, as it is the messy part. Because of the thickness, you can only trim off a few ends at a time. You can also trim them to a point too. Try it a few different ways.
Above is what it will look like after the trimming is done. Now, starting with one side, begin to separate the tissue paper, one sheet at a time. Taking care not to tear it.
Using one hand to work your way between the the pleats, while lifting the paper up with your other hand.
Do about half of the sheets on the one side, then turn it around and begin working on the opposite side. Once you have pulled up about 1/2 from both sides, carefully turn the pouf over onto the table to begin pulling up the layers from the other side.
Continue doing the same thing on this side, until you have all sheets separated. Then holding the attached ribbon, begin to pouf it out with your hands until you have a pleasing shape, and fullness evenly distributed all the way around.
Curl the attached ribbon, and hang it up, standing back to admire your work!
There you have it. Tissue Poufs 101. The color combos are endless, and I see these being a fun decoration for so many things! I will be making them in Christmas colors for the holidays, as well as small ones to attach to gifts!
So go ahead, and make some. Come back and share them with me. I want to see what you come up with!!!


.jpeg)


12 comments:
I use to make these when I was a kid. I forgot all about them. Darn it. I knew I should have bought that huge stack of vintage tissue at the Estate Sale last week.
Sweet Weekend Wishes,
Kate
Love these! Thanks for the tute.
I can't wait to try these...your right the possibilities are endless. You kind of loss me at the trimming part..(I can be such a glue sometimes) Each corner has to be trimmed? Straight across, or how do you round it? I probably will see this more clearly when I make one. And make one I will. Have a good week-end Kris. HUGS
I absolute love these. I can't think of a single party I need to take these to...yet. But I am just waiting for the opportunity:) What fun and goodness do they make things look festive. The girls' party looks so sweet - and so much fun! I just love how the island was set in the kitchen - the girls' pictures are adorable! Happy Birthday to both of them:)
Thanks for sharing the tissue pouf lesson:)
Fun! I bet you are going to cause an increase in tissue paper sales this weekend! ;)
Man....all I'm thinking is that I could really use some of that tissue paper for Claire's and Hannah's gifts...that's the reason they haven't found their way over to Genny's yet. Except for I need purple...or green...
Those puffs really are cute! If Riley's bday wasn't so close to Christmas I'd make some for her party! Thanks for the tutorial...I'll keep it for future reference, have a great weekend Kris!
These are perfect for quick decoration---thanks.....drop by my blog to pick up your award!
You made that look so easy! I bet I could screw it up though. So darn cute and I loved the way they looked at the party. Such a cool grandma!
hey....Those are fun...and look pretty easy to make. Thanks for the idea.
It looks so easy...but the one time i tried, I bombed. What is wrong with me? I think I'm a crafty person. Why can't I pull off tissue paper pom-poms?
Good job.
I'm going to give these a try for my January birthday--a birthday three friends and I share. We give ourselves a party!!
Thanks so much for an activity to occupy some cold winter days.
Best,
Bonnie
cool post thanks for sharing this post with us
paper cup suppliers in chennai
Post a Comment